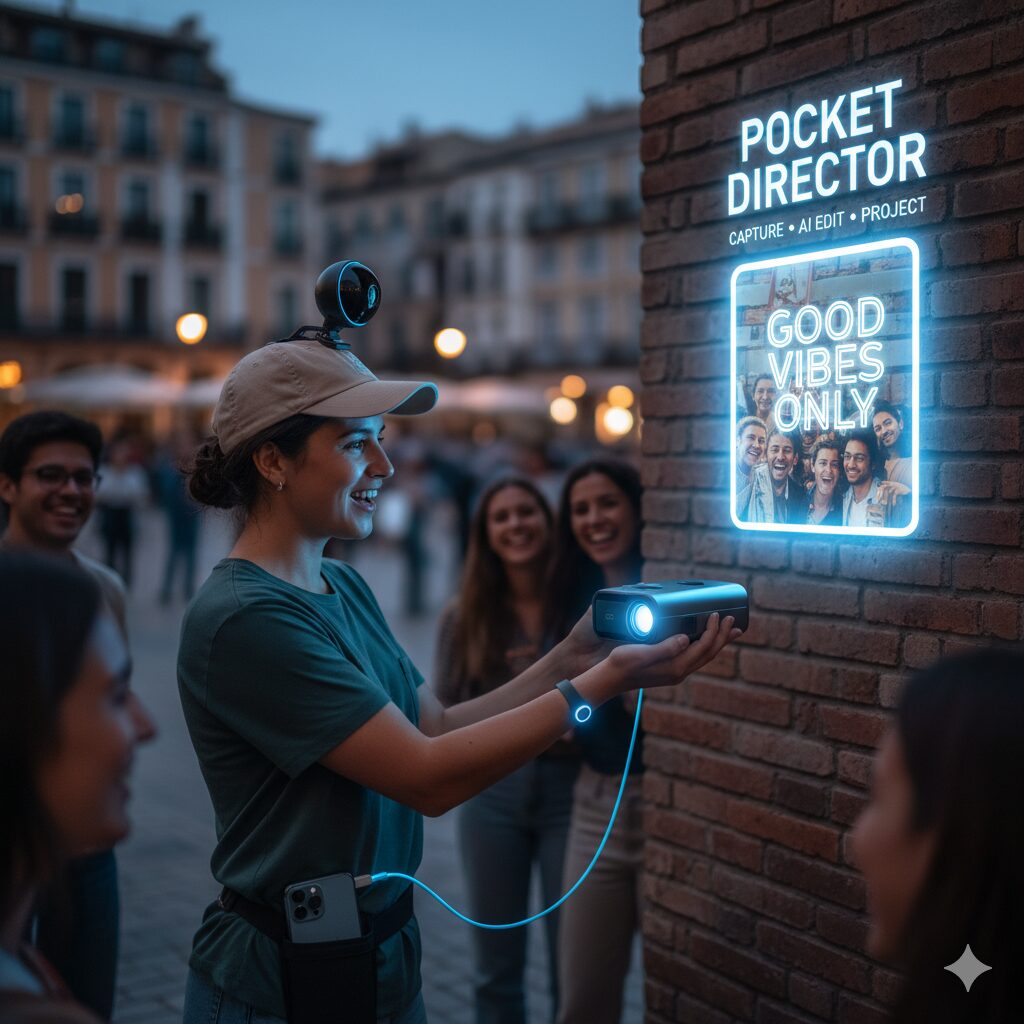
Build Pocket Director — Capture • AI Edit • Project
A compact, practical kit and step-by-step blueprint to assemble a device that captures short real-world moments and instantly projects AI-edited vertical clips.
Why this works (short)
Instant physical replay turns private micro-moments into communal reactions. The product is simple: capture → mark → auto-edit → project. Below: exact parts, wiring, software flow and code snippets so you can build a working prototype this week.
What you need (parts list)
- Mini camera — 1080p Wi‑Fi camera with wide-angle lens and RTSP or HTTP streaming. (Example spec: 1920×1080 @30fps, fisheye correction optional)
- Pico projector — 200–400 lumen, USB‑C/HDMI input or wireless cast support
- Bluetooth button — BLE programmable remote that exposes GATT events for short/long/double press
- Smartphone — iOS or Android to run companion app (editing + cast)
- Accessories — micro‑SD (optional), USB‑C cables, small case, clips
Hardware assembly (quick)
  ASCII CONNECTION DIAGRAM

   [Mini Camera] ---- Wi-Fi/RTSP ----> [Phone App] ---- Cast (Wi-Fi/USB-C) ----> [Pico Projector]
        |                                         ^
        |                                         |
     microSD (optional)                     BLE Button (paired)
                                               |
                                               v
                                          [BLE Smart Button]

  NOTES:
  - Camera streams to Phone (preferred) for low latency. microSD acts as fallback/storage.
  - BLE Button sends marker events to Phone (short/long press).
  - Phone runs AI edit pipeline and casts final vertical MP4 to the Projector.
  - For lowest latency, use Phone -> USB-C -> Projector when supported.

  Physical mounting:
  Camera: clip on clothing/hat or mount on strap
  Projector: pocket / pouch with lens exposed
  Button: attach to wrist/keychain/pocket for easy tap

  Quick legend:
  RTSP = camera stream protocol
  BLE  = Bluetooth Low Energy (button events)
  Cast = Miracast / Chromecast / AirPlay or USB-C video out
עכשיו תרשים ASCII מובנה שמדגים את חיבור הרכיבים והזרימה בין המצלמה, הכפתור, האפליקציה והמקרן.
Software flow (concise)
- Phone app connects to camera stream (RTSP/HTTP) and to BLE button.
- When button pressed, app records timestamp markers and stores raw buffer for ±2–6s around marker.
- App runs quick AI selection: score frames by face detection, motion energy, audio peaks; choose best 3–12s clip.
- Crop to vertical 9:16, normalize audio, auto-sync a short musical loop and add short headline text.
- Send resulting MP4 to phone casting API → projector, or save to storage for later post.
How to select the highlight — practical pseudo-algorithm
# Pseudocode: pick best subclip from a marked window
window = [t0-1s, t1+1s]  # marked start/end
scores = []
for each candidate_subclip in sliding_windows(window, length=3s, step=0.5s):
    face_score = detect_faces(candidate_subclip)  # count & size
    motion_score = motion_energy(candidate_subclip)
    audio_score = peak_loudness(candidate_subclip)
    score = 0.5*face_score + 0.3*motion_score + 0.2*audio_score
    scores.append((score, candidate_subclip))
best = max(scores).subclip
return best
Fast on-device tools & commands
Use these for a minimal prototype without heavy ML infra:
# crop and convert to vertical 9:16 using ffmpeg
ffmpeg -i input.mp4 -vf "crop=in_h*9/16:in_h,scale=720:1280" -c:a aac -b:a 128k -c:v libx264 -crf 23 out_vertical.mp4

# normalize audio
ffmpeg -i out_vertical.mp4 -af "loudnorm=I=-16:TP=-1.5:LRA=7" final.mp4
Mobile app building blocks (concise)
- Camera ingest: implement RTSP or HTTP stream reader (use existing libraries: libVLC, ExoPlayer, AVFoundation).
- BLE button: scan and subscribe to GATT characteristic; emit events to the ingest buffer.
- AI selection: on-device OpenCV face detection + lightweight VAD (voice activity detection) + motion energy.
- Rendering: FFmpeg or mobile-native video composition for crop/music/subtitles.
- Casting: use system cast APIs (Cast SDK, AirPlay) or USB‑C for low-latency output.
Example: BLE button handler (Android-style pseudocode)
// onCharacteristicChanged -> handle BLE events
onCharacteristicChanged(data):
    event = parseEvent(data)
    if event == 'short_press':
        buffer.markTimestamp(now())
    if event == 'long_press':
        buffer.saveMarkedSegment()
        startEditPipeline()
Testing checklist (do this every build)
- Button latency: press → marker recorded within <150 ms.
- Capture reliability: camera stream survives 2–3m brief signal drops or fallback to micro‑SD transfer.
- Edit accuracy: target >80% correct picks in controlled tests (laughter, visible face, audio peak).
- Projection visibility: test in 3 ambient light levels (dim, indoor evening, bright indoor).
Optimization tips
- Prefer 5 GHz local network for streaming; disable unrelated heavy network tasks.
- Reduce phone CPU by using native video pipelines for crop and audio normalize (avoid full re-encode when possible).
- Keep the AI model lightweight (face detectors like BlazeFace or MTCNN mobile ports).
Costs & expected performance (practical)
- Component cost: $88–220 depending on projector choice.
- Prototype time: 2–5 days for hardware assemble + basic app with edit pipeline.
- Typical delivery latency: 3–8 seconds from mark → project (local on-device path).
Final notes (short & direct)
This guide gives a minimal, practical path: buy components, wire mounts, implement BLE button mapping, ingest camera stream, run a small selection algorithm, crop to vertical, and cast the generated clip. Focus on reducing latency and improving selection accuracy — those are what make reactions feel magical.
#PocketDirector #DIYTech #AIProjects #SmartGadgets #InnovativeDesign #TechCreators #BuildYourOwn #FutureDevices #AIEditing #VideoInnovation #MakerCommunity #GadgetLovers #TechInvention #NextGenTech #CreativeEngineering
Leave a Reply