Introduction
A traditional rolling pin is simple: just a wooden cylinder.
But imagine a rolling pin that shows thickness, measures pressure, and helps you roll dough perfectly every time.
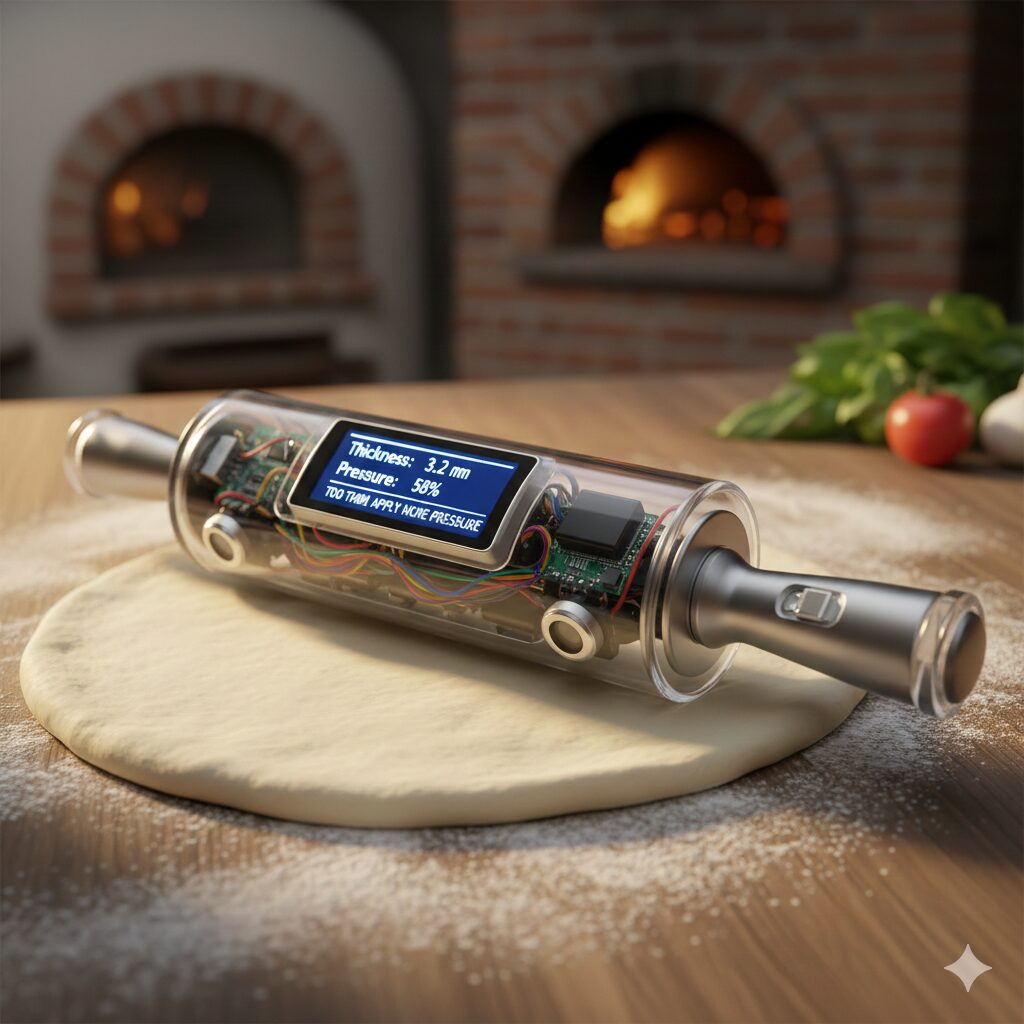
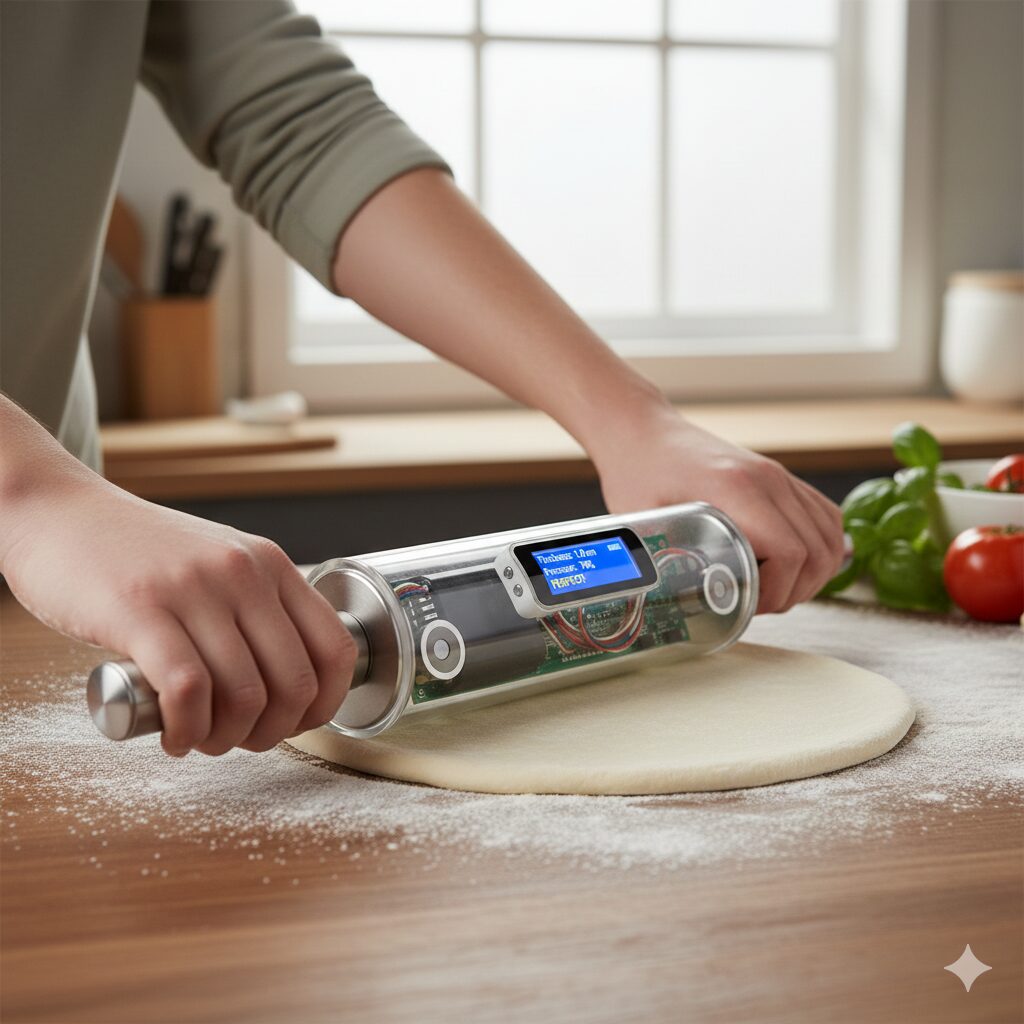
This is the idea behind the Smart Sensor Rolling Pin — a rolling pin enhanced with tiny sensors and a simple display.
This guide will explain:
- What the Smart Sensor Rolling Pin does
- How the technology inside actually works
- Step-by-step instructions to build one yourself
All written in simple, beginner-friendly English.
What the Smart Sensor Rolling Pin Does
A Smart Rolling Pin can include:
✔ Thickness Sensors
To tell you the current thickness of the dough (for perfect pizza, pasta, cookies).
✔ Pressure Sensors
Showing whether you’re pushing too hard or too soft.
✔ Temperature Sensor (optional)
Useful for pastry dough that must stay cool.
✔ Small LED or LCD Display
Shows:
- Current dough thickness
- Pressure level
- Alerts such as “Too thin!” or “Apply more pressure.”
✔ Rechargeable Battery Inside
Just a small Li-ion battery that powers everything.
How the Technology Works
The rolling pin contains three simple components:
1. Load Cell (Pressure Sensor)
A load cell measures how much force you apply when pushing the rolling pin.
- When you press harder → the load cell sends a stronger electrical signal.
- The microcontroller converts that into a pressure reading (0–100%).
2. Ultrasonic or IR Distance Sensors
These sensors are mounted on the sides of the rolling pin.
They measure:
- Distance from the rolling surface to the dough
- Result = dough thickness
Example:
If the sensor detects 32 mm from the pin to the table and the pin diameter is 30 mm → dough thickness = 2 mm.
3. Microcontroller (Arduino Nano or ESP32)
It receives sensor signals and sends results to the display.
Simple ASCII Drawing (Top View & Inside Layout)
 ---------------------------------------------------------
|                       Rolling Pin                        |
 ---------------------------------------------------------
|  [Cap]   [Battery]   [Microcontroller]   [Sensors]  [Cap]|
 -----------------------------------------------------------

Side View with Sensors:
                 _________
                /         \
    Sensor --->|  O     O  |<--- Sensor
                \_________/

Display View:
      +-------------------+
      | Thickness: 2.5 mm |
      | Pressure: 64%     |
      +-------------------+
How to Build the Smart Sensor Rolling Pin
Materials Needed
- Wooden or acrylic rolling pin (hollow if possible)
- Arduino Nano / ESP32
- 2× Ultrasonic sensors (HC-SR04) or IR time-of-flight sensors
- 1× Load cell (small 5kg)
- HX711 amplifier (for the load cell)
- Small 0.96″ OLED display
- Li-ion rechargeable battery + charging module
- Wires, glue, and a drill
Step-by-Step Instructions
1. Hollow the Rolling Pin
If the pin is solid:
- Drill a long hole through the center
- Leave enough wall thickness for strength
If it’s already hollow — perfect.
2. Install the Battery
Place the battery inside the center of the pin.
3. Add the Microcontroller
Mount the Arduino or ESP32 next to the battery.
Keep wires short and organized.
4. Attach the Sensors
- Drill two small holes on both sides of the pin
- Glue the ultrasonic or IR sensors so they face downward toward the table
5. Install the Load Cell
You can place the load cell:
- Inside the handle
- Or between the pin and the handle
This detects pressure when rolling.
6. Add the Display
- Drill a small rectangular window
- Place the OLED display flush with the surface
- Seal it with clear plastic for protection
7. Upload the Code
Use Arduino IDE.
Basic functions:
- Read distance → calculate thickness
- Read pressure → scale it to %
- Display results
8. Test and Calibrate
- Roll a known thickness (like 4 mm)
- Adjust calibration values in software
- Repeat for pressure calibration
Why This Rolling Pin Can Go Viral
This invention is unique because:
- It solves a real problem
- It looks futuristic
- It is DIY-friendly
- It can be built cheaply
- It can attract huge interest from cooking enthusiasts
Perfect for a YouTube Short, TikTok, blog, or online article.
Hashtags (SEO optimized)
#SmartRollingPin #DIYGadgets #KitchenTech #CookingInnovation #ArduinoProject #MakersProject #SmartKitchenTools #FutureCooking #RollingPinUpgrade #FoodTech
SEO Keywords (already integrated in the blog)
smart rolling pin
rolling pin sensors
smart kitchen gadget
DIY kitchen tools
how to build smart rolling pin
Arduino rolling pin project
sensor-based cooking tools
homemade smart gadget

Leave a Reply